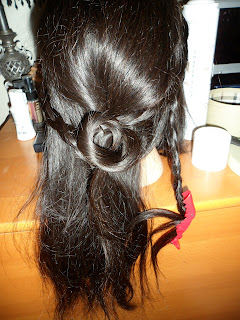
Hairstyles with braids will always be timeless, modern, chic, youthful, romantic and weaving in some pretty white flowers into the braids will instantly turn it into a wedding-bridal updo look.
Please note that my mannequin's hair is quite thin and black, which therefor, does not show hair textures very well in photos, like blonde hair. Moreover, her hair line and is different from our own so her scalp will be more noticeable in the photos.
I ran out of black bobbi pins in the middle of this hair tutorial so you might see a blond bobbi pin here and there, sorry! lol...
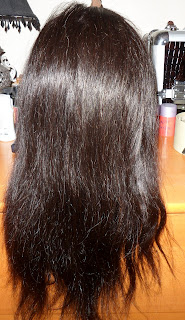
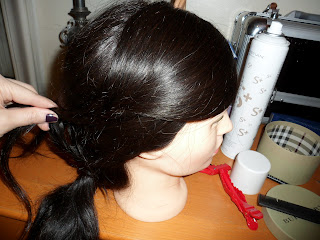
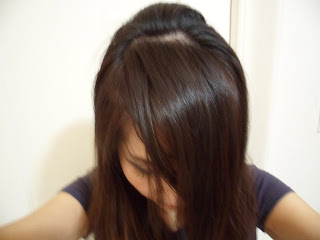
I started this blog with the intention of doing it on my own hair....then I realized, I couldnt take photo's with both of my hands busy...And this is why I ended up doing it on my doll. Anyway, if you look at my hair parting in this photo, that's what it should look like.
Doll before photo
I didn't curl my mannequin's hair because she's not going anywhere, but you should always start off by curling your hair with a curling iron (1/2 inch rod - you want the curls tighter) for any updo hairstyles. This will make it easier for you to manage your hair while braiding and pinning.
Section off your hair: Crown, sides.
Grab the back crown area and tease the roots and create a bird nest - (leave the hair in front alone, we will be braiding that into the side later)
After you tease the hell out of the roots, gently comb the top layer and start braiding it very loosely from mid shaft to the ends of the hair. We're going for that "Bohemian braid style". Loose and carefree. Tie it with a rubber band.
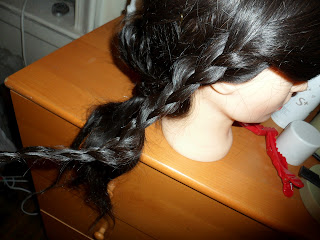
Next, you're going to create a french braid on each side of your temple (leave the top alone - we do this last - note my red clip), going towards the back of your hair, stop and pin it up when you get close to the middle braid. When both sides are braided, then you will connect all three braids - meaning, now you're going to use those 3 braids to create 1 fat braid.
For clarity, side temple braid ---- crown braid ---- other temple braid == created one funky looking thick braid. (this adds texture to your updo hairstyle)
Now, grab the lower parts of the front sides and braid that towards the back of your hair - do this on both sides. Try to create a tight braid for this area because it will make your head shape more attractive. Pin it back when you get to the end.
This is where you start creating loops, curls and more texture. Hairstyling is a lot like sculpting, you create shapes piece by piece and pretty much do what looks right.
Mixing into this hairstyle different types of hair braid.
Grab the hair in the back, piece by piece, create different types of braids, and pin them up, down, side ways. Then the last piece will be wrapped around the long tail. That long piece on the side you see is the crown/front hair, which we will do next.
I'm quite fond of Taylor Swift's side swept updo styles, sweep the hair to the side and start braiding it back.
Pin it back into the cluster of braid hairstyle you have going on in the back. You can rope it, tie it, make it as funky as you want. Loose braids look better..
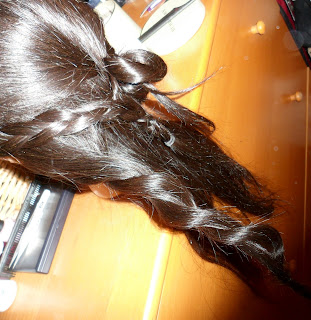
We're done! It's not attractive to have a stick straight, thin looking tail hanging down your back, so either tease that hair and fluff it up (photo below), curl it, or tuck it in if it's too sparse.
The white hair spray that you see in my photos is my Holy Grail item, I've loved it for 10 years.. Sebastian Shaper Hairspray makes your hair feel like hair, and has a matte finish. You can spray the whole effing bottle and your hair will still feel soft and moveable. It's the BEST updo hairspray you'll ever own, because it doesnt make your hair stiff, or shiny as if it's wet. Maybe I notice things like this because I'm a pro, but I hate it when people mess up a perfectly nice updo with a bad hair spray that makes your hair look... well, like you used a whole bottle of gel on wet hair.
Thanks for reading, don't forget to sub, take care! :)
Are you using the correct Straightening or Curling iron for your hair type? Read my post about Hair Irons here -- Ceramic and Titanium and other Irons.
Learn how to do this Chignon Updo at my new hair site.
If you've ever wondered how you can apply some natural looking fake under eyelashes like those supermodels who wear them so effortlessly , then this blog might pique your interest.
Although there are two kinds of lower eye falsies - Strip & Individual, today, I'm going to discuss the individual kind, because it looks terrific on everyone and anyone can get away with them on - at anywhere, any time, from the most conservative boardrooms to the raunchiest whorehouses, this is one skill worth learning.
Scroll down this page if you would like to watch my "How to Apply Fake Lower Lash Tutorial" on Youtube. :)
(I'm not wearing false lower lashes on the left photo - and Yay for Beauty Shot option - no pores!! Luv my Samsung PL120 xoxo)
Individual fake lower lashes are trickier to learn in the beginning because it's so incredibly time consuming to master. But really, it's all in the wrist movement, my beauties. Once you get it, you got it and it will take you literally 30 secs to get them on in the morning, so have patience! It's well worth the struggle to learn. But first, lets go over some ground rules.
In the following photo, *MY* right eye is done comically wrong (I was quite appalled and horrified at what I had done when I saw myself rofl -- but I refuse to redo it just for a photo..pfft..), but left eye is fine. Life is so funny, in my late teens and early 20s, this is when I was completely self absorbed, I would never have even considered posting a photo that made me look like I had applied my makeup in a drunken stupar.....
This is what happened: I was filming for Youtube and was too busy trying to look cute AND the closest damn mirror was 5 yards away because I had to sit REAL close to the camera - like, look up the nose close distance for the eye shot.. Do you know how SMALL mini lashes are?
It's a freaking miracle that I didn't stab myself in the eye and go completely blind and stupid, seriously - maybe I could have even sued Youtube then! haha ......Watch and sub me <3!
I used a total of 6 individual lashes on each eye, look how natural that ONE eyeball looks (because I finally woke up and grabbed a friggin' hand mirror during filming so I could finally SEE - hallelujah!) muahhaha hehehehe! ^_^
Anyways, the rules:
1) Finish your makeup first - lower lashes always goes on last. This includes mascara too, because you will not apply mascara to false lower lashes, this is one area where you do not want caked on makeup - If you want more drama, then you can apply it to the root area with a light hand.
Please do not apply mascara to the lower lashes (I know I'm being redundant here, but I've seen too many people ruining a perfectly good lash application with mascara), it might turn into ugly spider leg lashes if you don't know what you're doing!.. *shudder*
2) Always try to apply the fake lashes right under your natural lashes, or right next to one. This looks more natural then sticking them on top.
On a shoot, a paying job, you can get all picky and technical by lifting the lower lash hair with a Q-tip and apply it one - -- -- by - -- -------- - one. This is acceptable. Why? Because you're getting paid to be damn perfect, and you better BE perfect. However, at home...C'mon guys, no need to make a huge fuss out of it - it's only lashes, not heart surgery. Just slap it on.
But of course I just told you how you CAN get crazy picky, just use a Q tip to lift the lashes up (I dont like tweezer's near the eyes because accidents CAN happen, y'know..).
3) If you fuck up, and you want to *fix* it, DO NOT apply makeup remover to remove the false lashes. Instead, use an oil based lotion on a Q-tip and gently rub the glue/lash off. Afterwards, gently remove that lotion off with some water, so that it doesn't disrupt your makeup/primer/glue formulation. If you had applied a remover, chances are that your glue and makeup will wear off sooner from the chemical residue from the makeup remover...
4) It's easier when you allow the glue to get REAL sticky.
5) Do not attach it to your waterline. The lashes might end up rubbing on your eyes and cause some serious damage.
APPLICATION:
1) Put on all your makeup.
2) Squirt some Duo glue on something - back of your hand, legs, etc..anything a min or two before you're ready to start applying the lower eye falsies.
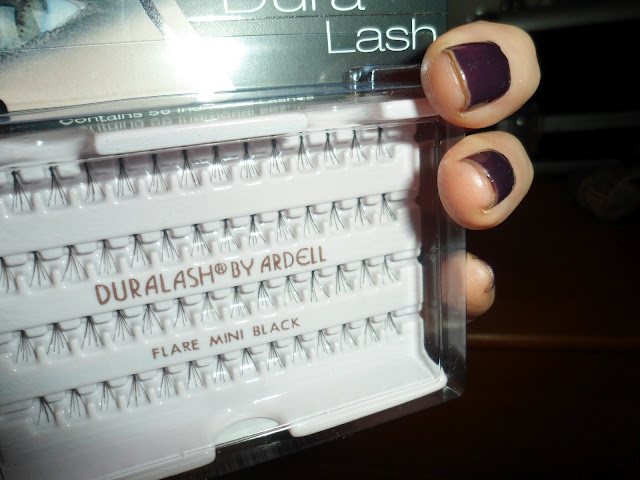
2) Grab some false under eye lashes or any lashes that you want - I'm quite fond of Dura Lash by Ardell - Flare Mini Black.
3) Now, how you hold the lash case is key. Look at the photo below - the flare part is at the bottom.
That's how you should hold it in your hand if you're doing the bottom lashes, so that in 1 swing, it lands perfectly on your lash line without you having to juggle.
If however, you were attempting to to apply the top individual lashes, then you will hold it upside down (flare at the top). It's as easy as one, two, three ...
Watch my Youtube video to see my lower lash demonstration.
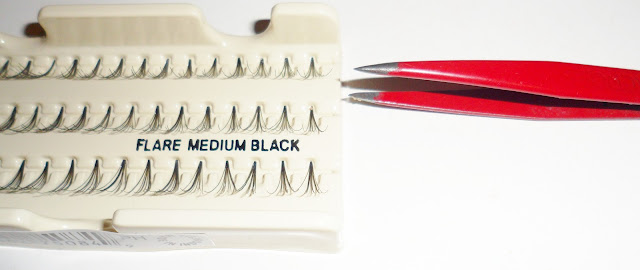
(just FYI, med flares are very LONG - I wouldn't apply this under the eye unless you're a camel)
You hold the box in one hand and your tweezers should be held horizontally (note red tweezer photo), and in this position you will remove the lashes from the case, then apply it to your eye. If you've done it correctly, your hand position will align perfectly to your lower lash.
4) Grab a lash from the case. Now, THIS is the hardest part.. these are some tough suckers to pull out...serious
5) Dip the lashes in glue, make sure that the lash glue is not runny and watery. I can't stress enough how much easier this is if the glue is tacky.. like thick, rubbery consistency. I would take a photo to show you but knowing MY skill in photography...er..
6) Apply as many as you like, and start from anywhere. I personally always start in the middle. 4~6 is enough for me, because I like it light but if you like drama, feel free to add more. Moreover, you can always mix and match by adding the longest to the middle (round eye) to shorter on the edge. Additionally, you can also add lots of short pieces in the lower wing area to create more drama and cat like sex appeal.
My fav lashes are Ardell and Gypsy Indivisuals, usually knot-free. And my nails are chipping already, applied it new two friggin days ago!
7) When the glue has completely dried, you can touch up/apply shadow liner, liner, or mascara to the roots. I used some dark shadow to darken the lashes on my Youtube video, and to draw more lashes manually with my R&L brush so that my false lashes will blend in better.
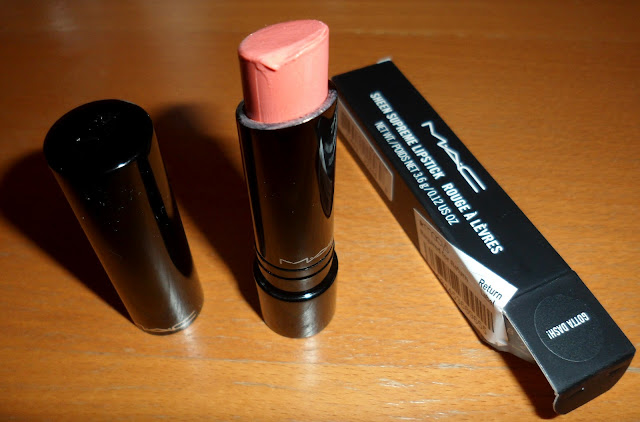
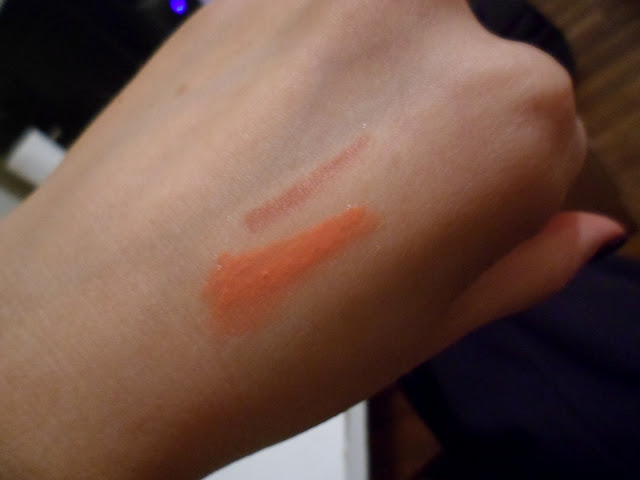
Ihave a new favorite Peachy Coral Lipstick that I want to review for you and it's called GOTTA DASH from Mac's Sheen Supreme line. I had hoped that my swatches and photo's that I took for this review could have shown some of the freshness and prettiness of this color, but alas, it didn't even come close.
This is a big rave review and I want to nominate it to being the best peachy-coral lipstick shade of 2012. Do you have a favorite peachy lipstick?
Mac's Gotta Dash Supreme Lipstick ($14.50 - 0.12 oz.), which looks as rich and soft and as shiny as a lip gloss has the lasting staying power of a regular lipstick. Not only does it last a long time, but it also feels amazingly smooth on and remarkably moisturizing and all this without the aggravating stickiness of a lip gloss.
This has always been my biggest pet peeve about lip glosses in general. You can NOT even consider going outside when it's windy with it on because all of your freaking hair will end up on your lips, then your hair will get all gooey and tacky... Argh! It's just nasty and you end up looking plain silly while it's happening, try looking sexy with 10000 hairs stuck on your lips...No.
Gotta Dash is a medium pigmented, semi Opaque Peachy NUDE, tangerine shade. In case you wondered, it won't make you look like a corpse, the color issimply too vibrant "in person" for it to look pasty on a person. I find that most death-like nude lipsticks tend to look like skin color, and no one on the planet has tangerine color skin tone. Go to the MAC counter and just test it out (isn't shopping for makeup a lot of fun? I can spend hours just swatching at a makeup counter - and this is so off topic lol).
I've heard about this color before and have seen the swatches in the past but I've never been truly impressed. And I will tell you right now that you wont be impressed with my photo's either.
But listen to me, this color looks 10000 times better in person.It's one of those unfortunate shades that doesn't show well in photos.
I don't mean that it looks bad or ugly, but that it looks like your typical nude shade with a hint of peach *snore*. This is the MAIN reason why I've been mostly "meh" about this lipstick in the past, but in reality it's phenomenal!
I've chosen to use a dark brownish nude lip pencil - Stila Contour 4 - with this lipstick because it makes my lips look fuller and I feel that it create more of a dimension to the lips with a shade like Gotta Dash. I applied it using my favorite lip brush - Royal & Langickel c601.
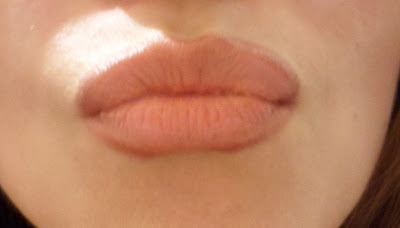
Photo's below: I'm not wearing my circle lens (color contacts), or fake lashes, and most of my foundation has worn off...
The grimace on my face is from all the fail photos I took tonight.
Out of focus look
Look at my fucking ARM here..it's HUGE!! And in this photo I'm BALDING and could use some Rogaine for women, talk about a HORRIBLE, horrible photo haha...Y'know you're an old fart when things like this no longer bother you (as much) and you find it funny instead...
Lip Pucker - No flash
None of these photo's showed the true beauty of this color *sigh*, and I seriously should have blended my lip liner better..
Color: 5
Texture: 5
Longevity: 4
Price: 3
Packaging: 3
Pigmentation:3
Repeat Buy: Yes
Thanks for reading!! Go buy this lipstick!!
Don't forget to sub, add me to everything and comment with your blog/youtube so I can visit!
Titanium or Ceramic Hair Straighteners and Curling Irons, what the heck are the differences? Ceramic, Titanium, Basic, and Tourmaline.. blah blah?... Read on for some tips on choosing the best plate type for your hair.
Does the types of plates used in Straightening Irons make a big difference?
You probably never figured out all the minor differences. Merely that that it's "better" than the oh so-boring and plain metal plate irons from the past because some Youtube "guru" said so and she had a discount code.
Well, today I'll tell you what the differences are, straight out of the Professional and licensed Hair Stylist's mouth, who's been doing hair for the past 10+ years.
Not much. The difference is THAT small, but your hair will be a tad shiner. The Hair Product companies claim that their irons are "healthier" - which is is debatable...
What you really need is just one solidly made hair iron that gets REAL fucking HOT, and something with a life time warrant - you don't need to buy one every year like they want you to believe.
A Flat iron or a curling iron like this will keep you happy for many years - you can freely leave it on your will for your great-grand daughter.
Every year, the big companies like CHI, GHD, T3, Cortex and etc, come out with the next "new" plate of curling irons that we all MUST go out straight away, right this second to buy, or we'll just go COMPLETELY frizzy - then of course, we need to grab another gallon or two of the strongest heat protectants hair gel in the market , because they keep making the curling irons hotter than lava .... I'm waiting for these hair styling companies to come out with a hair primer next....
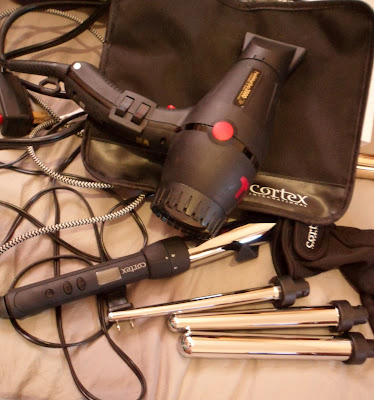
I will take some photos of my new fancy-spancy curling iron that I bought this year for work from the International Beauty Show in NYC down below.
I, of course, buy them up because clients like to see their stylist using the latest, which I completely understand. Moreover, I want to test them out foe myself, because it's my job to test out new trends and playing with toys like these do keep things fresh.
But honestly, guys, my clients all leave my chair looking pretty much the same, fabulous .. I never see any profound reason to push anyone to buy a new iron when they already have 1-2.
I do notice that the hair being a little smoother without the hair serum ( Moroccan Oil). But I think that has more to do with my Twin-Turbo Ceramic-Ionic Pro Blow-Dryer that kills static in the hair than the iron itself...
The BEST Hair Dryer. Bar None.
Rule of Thumb
If you have fine to normal hair,especially if you have hi-lighted/chemically processed hair , then you're
perfectly fine using a hot straightening and curling iron like GHD that
heats up to around 375 degrees. You do NOT need a 450 degrees curl killer! You will seriously damage your hair if you don't know what you're doing.
Most Asian hair (unless it's very chemically processed from too much Ombre and highlights!), anyone with kinky hair, or coarse unruly curly hair: An iron that can get HOT (around 450), like the Cortex and T3 will
work brilliantly. Just make sure you go slowly. I use this heat
settings on my own hair...
The key to a fiercely smooth hair has more to do with how hot the iron gets than all the fancy-spancy spin they put on a piece of metal.
Let me just recommend this Hair Protectant I discovered few months ago and am now am completely obsessed over before I forget - you might have seen it in some of my photos --
Alterna
Bamboo Smooth Kendi Oil Dry Oil Mist -You spray it on WET hair and your hair is going to SHINE after you flat iron straighten or curl it on DRY hair. Thank me later /nod.
Knowing your hair texture,
Making sure that your iron is heating up evenly and distributing the heat correctly,
Knowing what temperature to use for your hair type,
What products to apply before and after is what gets you that smooth, silky Victoria Secret's model's sexy mane.
Lets go over the different types of irons out in the market right now.
If I mention an hair iron here, please believe me when I say it's a great iron because I've either personally used it or a close colleague have raved about it among our circles.
Basic Curling or Flat Irons
Special tricks: None - It gets hot. Price Range: Dirt cheap ($20~30) CONS: Don't buy the FLAT irons. These will promptly start pulling on your hair as you run it through. Still, it gets HOT and it's cheaper than dirt.
I still have Gold N Hot Tools Curling iron that I bought when I wa in the friggin MIDDLE school, people!! I'm in my mid 30s now! It's still works great (taped up and all haha) and it's only $20, what could you possibly complain about?...
I'm gonna take a photo of this. It's like my "blankie"... it's completely falling apart, my clients laugh at it when I whip it out but I refuse to let it go... Ok, just looked, it's at the salon. I'll take a pic later! No, wait, I found it. I'll post it below!
Ionic Curling or Flat Irons
Special tricks: Simply put, it kills static.
Price Range: $100 CONS: Price. IMHO - Go buy a great Ionic & Ceramic blow dryer like mine. It will cut down on your drying time by half and no static in the hair to worry about when you're ready to curl or flat iron your hair.
Ceramic Curling or Flat Iron
Special tricks: A non-metallic material which is baked onto the plates in thin layers. Most Ceramic Plates are made out of Aluminum plates coated in Ceramic.
They HEATS UP SUPER fast (GHD Flat Irons), distributes heat more evenly, it kills static, makes your hair shiner than your traditional curling iron. They "claim" it's healthy for the hair, which I call complete bullshit lol. I think it's more accurate to say, looks healthier. Anytime you apply intense heat to your hair, its bad - don't be a sucker.
Price Range: $100~200. CONS: Price IMHO If you're going to spend 100~200 on a iron, get Titanium.
Tourmaline Flat Iron or Curling Iron
Special tricks: Made out of crystals that is finely grounded and applied over the plates. It is believed that the crystals allow the hair to be straightened faster, thus producing less heat damage to the hair. To me this sounds very logical. Less heat always means less damage to the hair shaft.
Price Range: $100~300 CONS: Price. PRICE.
IMHO If I was willing to spend $100+ on a iron, I would grab something like this or Titanium.
Titanium Flat Irons Or Curling Irons
Special tricks:This is the Bentley of all Flat Irons as of 2012. It gets hottest, shiniest, heats up the fastest, the plates are more lightweight, its more durable so it's great for the Pro, distributes heat more evenly, straightens hair faster, thereby cutting down heat used on the hair cuticles (LESS damage) - If only it would cook and clean out my toilet for me....
IMHO It's worth it *if* you curl or flat iron your hair almost everyday, other wise, I would suggest you look into getting the Ceramic or Gold and Hot hair irons.
Do you see that taped up curling iron at the top? I was aiming at it but apparently, my aim was off...
My irons are pretty expensive but it's also some of the best in the market right now...and I see that prices have gone down by a lot! Completely worth the money.
I'm so God awful at taking photos...
I have to put my name on all my gear like I am in Pre-school because walk-in clients keep stealing it!.
My Recommendations Below
I'm only listing the hair irons that I have either personally used or a real life Hair Pro friend has raved about below.
GHD Flat Irons (I'm not 100% sure but I think GHD only goes up about 375 degrees)
How to Make Your Lips Look Bigger Without Surgery, you ask? With makeup that actually works - Too Faced Lip Injection Extreme Plumping Lip Gloss - and I can show you the before and after photos. Mind you, my pictures were taken without any makeup ( I didn't even bother slapping on some foundation, lip liner, Adobe photoshop, nothing to pretty myself up) .
The lip plumper will most definitely irritate you and sting your lips depending on your skin sensitivity.
It's an annoying kind of pain than a "OMG! ouch ouch get if off me" type of torture... Don't be a wuss~! :)
With that said, your skin does gradually adept to the irritation like any other strong beauty miracle lotions and potions like Retin-A or Vitamin C Serums, and over time you will build tougher immunity to the plumper.
Moreover, the effect from the plumping lip gloss, from my experience, only last a few hours
anyways, so expect to use it just a few times a week at the most....
That's tragic. Truly... Because it means it will stop plumping my lips eventually if I over use it. Damn.
Lip Pumpers causes your lips to swell from an allergic reaction from ingredients like - menthol, cinnamon, or mint, niacin, ginger--or even from the chili
pepper ( I should go slap on some KIMCHEE).
I took this photo for size comparison. It's quite small compared to the MAC lipstick or the Too Faced Glamour Gloss in Peek-A-Boo Lip Gloss ( a pretty shimmery cool pink, flattering on everyone) , which is another "minty" plumper.
Therefor, you will come across many types of Lip Plumpers:
Ones that will make your lips feel cold (which I can honestly tell you, didnt do jack shit for my lips plumping wise ( Too Faced Glamour Gloss - gave me a slight puffiness but wasn't painful at all. It was kinda pleasant)
Or hot and stingy ( Too Faced Lip Injection Extreme). This type WILL work and sting like a bitch if it goes outside of your lips, which I do purposely because it makes your lips bigger yet! *cackle*
The intent of the lip plumpers are to makes the blood vessels dilate, which
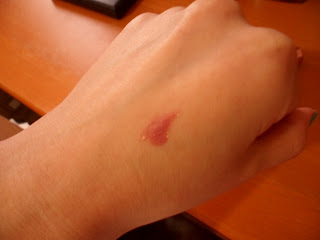
increases the blood flow to the lips, so you may experience a rash like reaction - red, blotchy, deep swelling, etc. Yup.. as you will see below.
As you can see, it's pink and red and there are some areas of blotchiness from the irritation.
You're NOT suppose to apply it outside of the lips, but I do slightly, because it does makes it bigger (theres a tip! ).
I am not wearing any makeup here ....
Before with NO flash
AFTER with NO Flash
Some things you need to be mindful of:
Applying any type of gloss on your lips will instantly make it look bigger, therefor although in some photos they do seem like it was enlarged by a lot, it's a slight enlargement.
Don't expect to look like the next Angelina Jolie. The plumping is pretty slight and it will gradually go down... The surgical way of enlargement is still the most effective. This way is just safer.
I use this not merely to get bigger lips but to plump up my aging lips from the loss of collagen. I'm in my mid 30s, the aging process has started with a vengeance many years ago, so if you're someone who's also in your 30s, consider using a plumper not just to make your lips bigger but just so that your lips will look NORMAL again!
I feel your pain *HUGS* ! <3
It DOES, hands down, WORK. But it does not last and it's not a miracle lip plumper. Be rational in your expectations...
One of the bestAnti- Aging: Skinceuticals Vitamin C Serum in the market.( Dont get this near the eye, I got a rash that lasted a good 2 weeks from it, because its so potent).
Thanks for stopping by. Sub, follow, etc etc.. Leave behind a site addy that I can go visit too. byeee~ :)